Monday, March 19, 2012

Grease Filtering System

I recently realized that I've never documented the process that we (mainly Russ) goes thru to make it possible for us to drive a car the runs on waste vegetable oil (WVO).  So here it is....
This system has evolved for Russ and his friend Alex over the years.  When we first started (and still when we are on the road) we have a sock-like filter that we poor hot grease thru to get the french fry crumbs out and then we put the WVO directly into the tank.  Similar to gasoline and diesel fuels....you can put low quality fuel into your car if necessary, but the better the fuel the happier the engine.  This may make you think that we are crazy, why not just by fuel (b/c time is money-right?)  I don't feel that everyone needs to drive cars that run on waste vegetable oil.  I just feel that we all need to be doing something to help the world be a better place.  This is one of the ways that we choose to do our part.
Step 1: Using air compressor, make sure vacuum has
been created in tank that is hooked up to vehicle.
Step 2: Find WVO (waste vegetable oil- from restaurants that
use a fryer) and suck decent looking oil out of container. 
Step 3- transfer oil to barrel for stage 1 of settling.
The settling process is important to let
water/bad oil separate from the good oil.
Step 4: Transfer oil to stage 2 of settling.  The pipe coming out
the bottom of the barrel is to drain the bad oil (which is heavier
than the good oil) for disposal.  The tube coming out of the right
side is for transferring the good oil to the next step.
Note: In the settling process the good oil separates from
the bad oil.  What we see in this jug is the amber color
and the creamy color.  We want the amber color.
Step 4: Good oil (amber colored) is transfer to this barrel
where it is heated and sent thru the centrifuge.
This is the centrifuge.  The particulate matter that is in the oil is
spun out into a holding area letting only the good oil fall
back thru into the tank.
Step 5: The clean oil is then transfered to this
barrel for further settling.
Step 6: Final storage until it is needs to be used. 
Step 7: This is how we get it from the big tank to the
heated tank that sits in the trunk of our car.
                                                     
If only that meant the process was done!  Step 8: All of the bad oil
has to be removed from the situation to make room for new WVO
to be processed.  So it is sucked into the trailered
tank to be disposed of.

Saturday, March 10, 2012

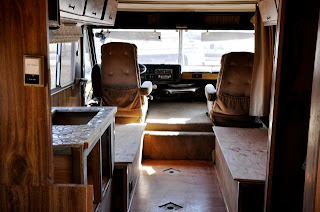
Travel Queen Remodel Progress

Russ tore out the old kitchen and built a new frame.  
Mollie and I did a mosaic tile countertop for under $20.  
Russ will be putting in the sink, stove/oven, and cabinet doors in 
the next couple of days!


This view is from in between the driver and passenger seat.
We are still working out how to buy or make cushions at an affordable
price.  Under the bench on the right will be the water storage.
Under the bench on the left will be regular storage.
There will be 2 bunk beds in the back (4 twin size beds).  Our friend Casey,
says there is plenty of room for her on the bench on the left. :)

Notice the beautiful laminate wood-like flooring.
A custom table will be created for the space.

The curtain/blinds are in too good of condition to get rid of, so the
lovely colors for the space that we are working with are peach,
lilac, cream, white, and camel.